
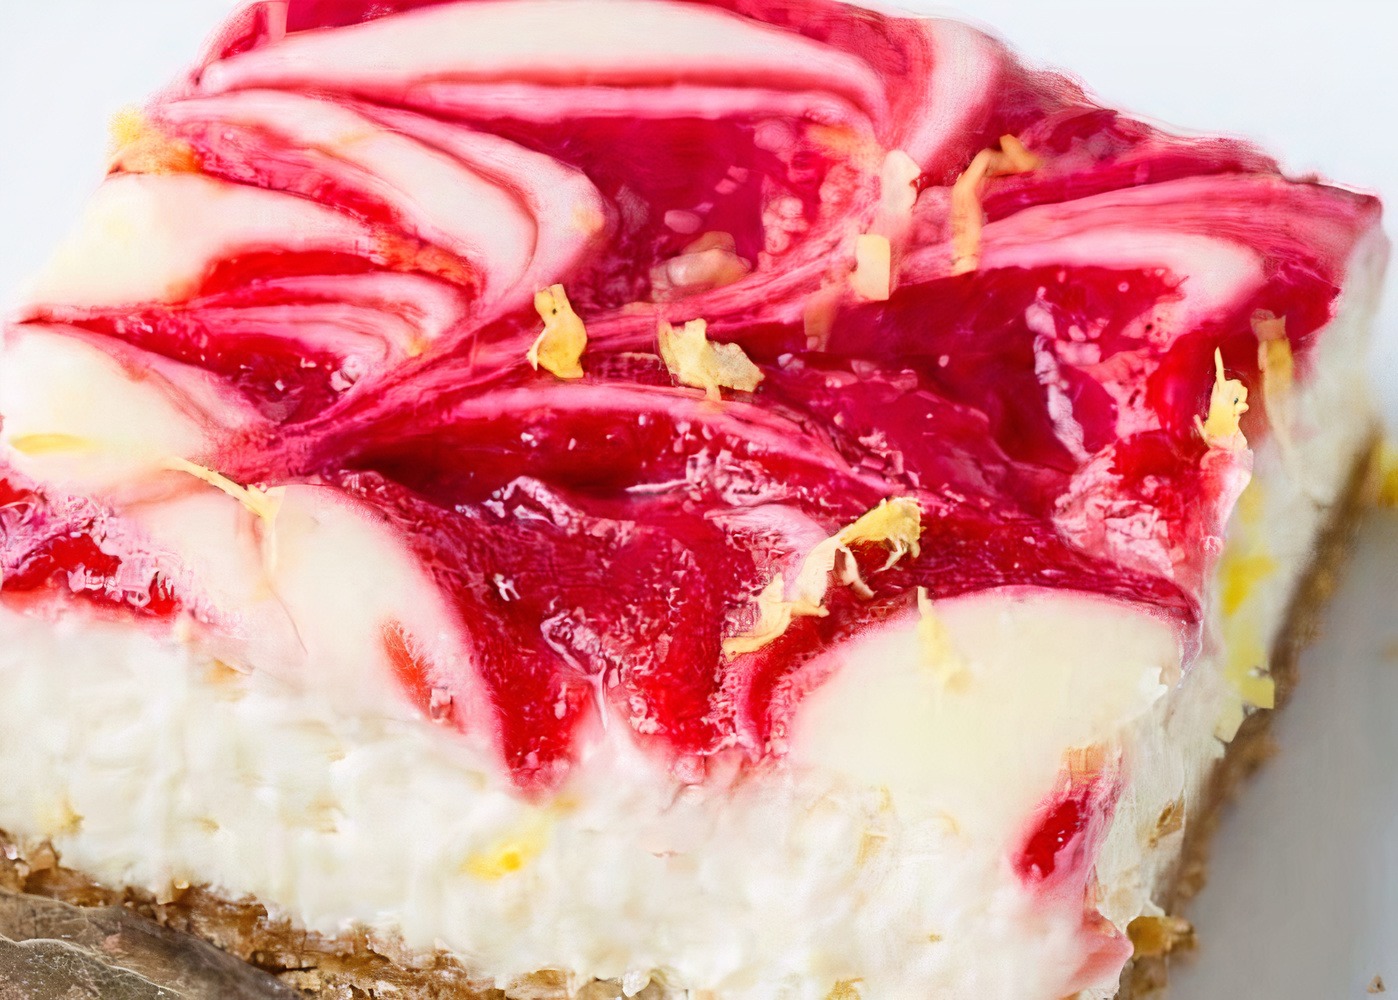

Raspberry Swirled Lemon Squares
Almost too pretty to eat, almost! These swirled raspberry lemon squares are my new favorite dessert!Super easy, no-bake, decadent cashew, lemon filling topped with tart raspberries swirled into a pattern and a nutty crust! Yes, please!This recipe is free from refined sugar, grains, gluten, dairy and eggs. A creamy and healthy dessert or snack. Its made from plant based whole foods and not the usual processed sugar-laden biscuit base and condensed milk (with 40% sugar) filling. Its an easy make ahead dessert and its pretty as a picture, a no fuss yummy treat with a healthy twist.This stunning magenta-swirled dessert uses fresh or frozen raspberries to dress up a light and creamy cheesecake like filling,making it a treat you can enjoy year-round.The recipe calls for you to strain the raspberry sauce if you prefer, to remove the seeds, but keeping them in the purée does add texture and crunch for a nice touch. These little raspberry lemon squares are just too cute. They would be a perfect treat to make for your special someone on their birthday or a special occasion like Valentine’s Day.If you have a partner, you should definitely make this recipe for them. If you don’t have a partner, let this recipe be your Valentine. Food > Love.A simple, healthy and delicious recipe, made with only natural ingredients and comes together in a flash. All in all, its downright magic!
Ingredients
Base Crust
- 1 1/2 cups almonds, walnuts or a mix
- 1 cup dates, soaked at least 30 minutes and drained
- 1/2 cup oats, instant or quick
- 1/2 cup desiccated coconut
- 1 teaspoon vanilla extract
Lemon Filling
- 2 cups cashews, soaked 3+ hours and drained
- 1 13.4 oz can coconut cream, full fat (solid part only) *see note below
- 1/4 cup coconut oil, melted
- 1/4 cup honey or maple syrup
- 2-3 lemons, juice and zest (depending on how lemon-ey you like it)
Raspberry Topping
- 1 1/2 cups fresh raspberries (if using frozen, drain the excess liquid off first)
- 2 tablespoons honey or maple syrup
Instructions
Base Crust
- Note: Place the can of coconut cream or milk in the fridge or freezer for at least 1-2 hours before making these bars to allow coconut cream to separate.Line an 8 x 8” baking pan or dish with parchment paper on the bottom and sides leaving some overhanging to act as a handle to get the bars out easier for cutting.Place almonds and coconut into a food processer and process until broken down and crumbly. Add dates, oats and vanilla and continue to process until mixture is sticky and well combined. Be careful not to over process as its nice to have texture and different sized “bits” in your base crust.Press the base mixture into the bottom of your pan or dish evenly. Refrigerate while you prepare the filling.
Lemon Filling
- Open chilled can and scoop out the cream that has separated and set hard on the top. Save the remaining coconut water to use in a smoothie, drink, or discard.Place all filling ingredients, cashews, coconut cream, coconut oil, honey, lemon juice and zest into the food processor and process until smooth and creamy. Depending on the power of your blender this might take a few minutes. Stop blending to scrape the sides if necessary and continue to blend until very smooth. Taste test and add more honey or lemon if you think it needs it.Pour the filling over the chilled crust and spread evenly with a spatula or the back of a spoon, then place back in the refrigerator while you make the raspberry sauce topping.
Raspberry Topping
- Blend the raspberries and honey into a sauce. You can strain if you like to remove the seeds if you would like a smoother sauce, but its up to you.Add dollops of the raspberry mixture over the filling and use a knife to swirl it around and into the filling with figure 8’s, or whatever design you like.Cover with plastic wrap and freeze for at least 4 hours (or overnight) or until solid. Before cutting, allow the cheesecake to thaw in the fridge for about 20-30 minutes, then use a sharp knife to cut into 8 bars of16 squares.
If you are looking for more delicious, healthy, no bake desserts and treats to help you reach your health, wellness and fitness goals, you will love my collection here: Blended Bites